UNDER THE SEA


 Humble Beginnings

Hi everyone, Monique here. I’ve been playing guitars for years, but have never spent much time learning about the repair side of things, so I decided to build a Partscaster to better familiarize myself with the work that we do here at the shop. From the initial plan to the final set-up, the techs at the shop helped me with the project, but I did the work myself, and am really happy with the result.

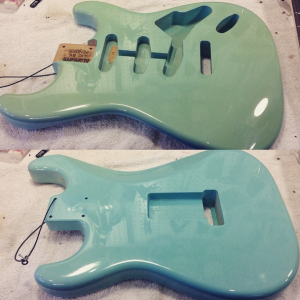
There was already an AllParts Strat body here at the shop, and I decided to turn it into a “mermaid” strat based on its odd two-tone coloring. I’ve always liked the feel of Strats but have never been a big fan of single coil Strat tone. To make this something totally different than my other guitars, I decided to go with all gold hardware and the Seymour Duncan Yngwie Malmsteen Fury set. I liked the high output of the Fury’s, and after listening to a lot of videos about them on YouTube, they seemed very versatile, which I thought would work well with the effects I use.

Since there are so many things to think about when making a partscaster, I decided to make a board on Pinterest to capture the key elements I wanted in the guitar. I also looked at other surf green Strats to see what other people had done before me. Not a lot out there with gold hardware!

[siteorigin_widget class=”SiteOrigin_Panels_Widgets_Image”][/siteorigin_widget]
[siteorigin_widget class=”SiteOrigin_Panels_Widgets_Image”][/siteorigin_widget]

The Neck

I ordered a rosewood fingerboard neck from AllParts but wanted abalone inlays to match with the mermaid theme. Tomm showed me how to drill out the existing inlays with the drill press, using the correct drill bits. Since the inlays I ordered from AllParts were a bit small for the inlay cavity, Lewis showed me how to fill the cavities with rosewood sawdust and use that as a base to keep the inlays flush after gluing. I then filed down the inlays until they were perfectly flush with the fingerboard under Geoff’s instruction. The hardest part of this process was learning how to feel when the inlays were perfectly flush, since I don’t think about feeling the fretboard inlays much when I’m playing the instrument.

Lewis taught me how to make a nut from a bone blank. The most important part that I learned from him is that when you construct a nut, it should be of a caliber similar to crafting a piece of jewelry. I was able to cut, fit and slot the nut and then finish its construction when I later leveled the frets in the Plek.

[siteorigin_widget class=”SiteOrigin_Panels_Widgets_Image”][/siteorigin_widget]
[siteorigin_widget class=”SiteOrigin_Panels_Widgets_Image”][/siteorigin_widget]

Electronics

Screen Shot 2015-06-02 at 5.34.18 PM

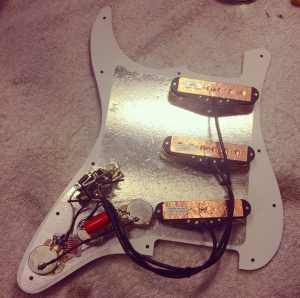
I have never used a soldering iron before in my life but I actually felt that electronics portion of this was the easiest part. I’m a pretty straight-forward guitar player, as I don’t really roll down the tone very often while I’m playing. Tomm suggested doing a blend between the neck and the bridge pickups for the second tone knob, which I was happy to try out. The most important part of the electronics for me was the importance of keeping everything neat & tidy, tinning and collaring all the leads where they make contact, and making sure the destination of the lead is heated up with the soldering gun before soldering the lead to avoid cold solder joints.

I covered the YJM Fury’s with gold pickup covers…looking back, it would have also been cool to get gold pole pieces.


Finishing & Details

To make the neck nice and smooth, I used Tru-Oil gunstock oil. I applied many layers over the course of a week or so, and the results came out wonderfully. If I do another project like this again, I will definitely stick with the Tru-Oil to achieve a similar result. For the hardware, I tried my best to do all gold. For the knobs, I decided to go the route of Q-Parts abalone knobs as I’m not a fan of the traditional Strat plastic knobs. The quality of Q-Parts is amazing and I will definitely order from them again.

The headstock part of the project was the hardest for me mainly because I had some issues with the waterslide decal. It applied okay, but didn’t seat all the way. After applying some wood glue and a few coats of lacquer to make the edges disappear, the “Made in USA” portion ripped off. After a few more coats of lacquer, the M of the Mermaid font bubbled and ripped. I decided just to touch it up gently, lacquer it one more time and just sand it & accept the outcome. At this point, I really wanted to play the guitar and since there are some cosmetic flaws on the body, I thought the “weathered” look of the logo might just work for the instrument as a whole. I hope I get to work with lacquer again to improve my skill.

[siteorigin_widget class=”SiteOrigin_Panels_Widgets_Image”][/siteorigin_widget]
[siteorigin_widget class=”SiteOrigin_Panels_Widgets_Image”][/siteorigin_widget]

The Completed Product

After everything was put together, the guitar was Plek’d and setup. The end result is a guitar that leaves people asking “where DID you get that guitar?!” The action is nice and low, and the guitar roars on high gain settings. But the best part for me was showing it to my grandma, who bought me my first few guitars and helped to pay for my guitar lessons when I was a kid.

Thank for reading.

[siteorigin_widget class=”SiteOrigin_Panels_Widgets_Image”][/siteorigin_widget]
[siteorigin_widget class=”SiteOrigin_Panels_Widgets_Image”][/siteorigin_widget]
[siteorigin_widget class=”SiteOrigin_Panels_Widgets_Image”][/siteorigin_widget]